I will be going through the Moodle installation steps in this post.
Note that this post is targeted for the beginners.
As I mentioned in my previous post, there are two ways of installing Moodle, locally and in a server.
I will be discussing how to install Moodle, locally in your machine.
So as pre-requisites we need xampp and Moodle setup.
According to the previous post there are two packages of Moodle distribution, Moodle standard package and Windows Moodle distribution. There are MacOS X special installers as well but, for the time being I will be guiding you on the windows OS.
1. If you are using Moodle for testing purposes(no development) I recommend you, to use the Windows/MacOS X installers. These installers are bundled with XAMPP package therefore, there is no need of installing XAMPP over again. To install Windows installer, Visit http://download.moodle.org/windows/ and select the latest stable version or click on the Microsoft installer (Refer Figure 1). It will download an executable file which will lead into installing Moodle in your local system. This is only for demo purposes. You can only change the view of the Moodle system by using this package.

Figure 1
2. If you need to perform code level development, you have to use the Moodle standard package. First, visit http://download.moodle.org/ and download the latest stable version(Refer Figure 2). If you are using Windows, then download the .zip file or download .tar file for Linux.

Figure 2
3. If XAMPP is not installed in your machine download and install it from http://www.apachefriends.org/en/xampp-windows.html if you are using windows. Note that you must select the exact version compatible for your personal computer (i.e. you cannot install 64 bit version in 32 bit computers). Check if XAMPP is properly installed and up and running by typing http://localhost in your browser address bar. If it works, it must display page with welcome page of xampp(Refer Figure 3).

Figure 3
Sometimes if it does not work for you, check http://localhost:80 or http://localhost:8080. Still, if the browser throws a “Unable to connect” error then it is most likely that Apache service has not started. To check this, click the XAMPP control panel in your xampp installation folder. If it is not running you must see Run button for Apache service. Do not click the Run button here instead, go to the same installation folder and click xampp_start application(This is because when you click run in control panel sometimes it will not start the service, which happened to me so several times). It will then, open a command prompt and display if the service is running(Refer Figure 4). If you get an error that the port is currently in use(Refer Figure 5), you must go to task manager(Ctrl+Alt+Delete) and delete all the processes which are java.exe, httpd.exe and mysqld.exe. Then re-run the xampp_start again.

Figure 4
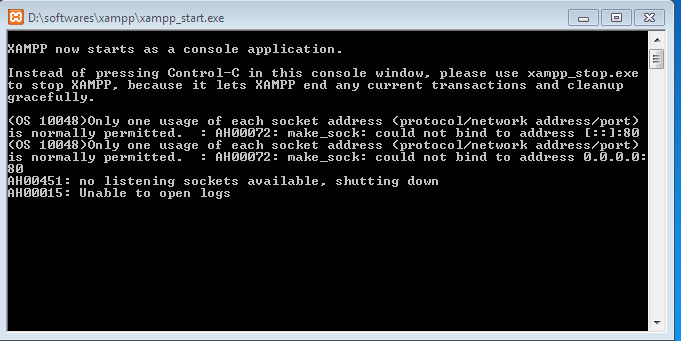
Figure 5
4. Now it’s time to install Moodle 🙂 First un-compress the Moodle zip file and copy the Moodle folder and place it inside xampp/htdocs folder.
5. Create a new empty folder moodledata outside the document root(All the cache will be stored here). Most preferably inside xampp folder.
6. Go to http://localhost/phpmyadmin and create a database called moodle with collation utf8_unicode_ci(Refer Figure 6). If you do not use this collation, later on Moodle will throw you exceptions and sometimes Moodle might not work at all.

Figure 6
7. Now loaded with guts, in the browser address bar, type http://localhost/moodle
8. As the first step of installation, it will ask for the language. Choose your native language.
9. As the second step you need to give the moodledata path. Other paths will be taken automatically.
10. Then select the database driver(default driver is fine) and click next.
11. The next step is one of the important steps in the installation. You must give the correct db host, name, user and password prefix. Let me explain what all means.
Database Host : Is the common URL which your database resides on. By default it is localhost.
Database name: Is the database name of moodle.
Database user : By default it is root.
Database password: If you did not set a password in phpmyadmin, this field must be left alone. But, it is recommended that you set a password for the database.
Tables prefix : Is the prefix given to uniquely identify Moodle tables. You can give any prefix you want.
12. Now you will be prompted to accept the copyright notice.
13. Then the installation will check if you have reached the minimum requirements to install Moodle. If it successful, you can see at the bottom, with the minimum requirements reached message with Continue button (Refer Figure 7). Unless the status will be in red for some extensions. If you have red statuses for extensions, you must go to php/php.ini and uncomment the extensions by removing ; and save. Then restart the apache service.

Figure 7
14. After that the tables for Moodle will be created. This will take some time. Better have a tea and come! 😀
15. When it is completed click continue.
16. After that you will be prompted to enter the administrative details. Click update details.
17. Eventually you have successfully installed the Moodle!!!
Now go through the Moodle site, click the links and get familiarized. If you have any issues in installing raise your issues here!!

